

Recipe: Eating on a Dime Black Rice Country Bread
Recipe: Eating on a Dime Black Rice Country Bread Delicious, fresh and tasty.
Black Rice Country Bread. Our Gluten Free Exotic Black Rice Bread, has the same moist texture of our other gluten free rice breads with the added flavor and nutrition of Black Rice Flour. Black rice is known to contain natural antioxidants like those found in many dark berries and it is loaded with fiber! Add all ingredients, in the order listed, into the bread machine loaf pan.
Turn out the dough onto a lightly floured work surface.
Try this Black Rice Bread, shared with us by Sharon from Thermorox. "By adding rice to your bread you'll get a slightly different flavour, and by using black rice you'll get a lovely colour contrast too.
Of course, you can certainly use white rice!
You can cook Black Rice Country Bread using 7 ingredients and 12 steps. Here is how you cook it.
Ingredients of Black Rice Country Bread
-
Prepare of *Strong (bread) flour.
-
It’s of *Dry yeast.
-
Prepare of *Sugar.
-
It’s of *Salt.
-
You need of Black rice.
-
Prepare of Water used to boil the black rice.
-
Prepare of Lard (or shortening).
While your bread is still light and fluffy, the rice adds more bulk to the bread.
This bread is made with freshly ground black rice aka forbidden rice flour, whole wheat flour, yeast and coconut oil.
This loaf is flavorful, slightly densed texture and distinctly delicious.
It makes a nice change and different from the regular sandwich loaf which are light, fluffy and spongy.
Black Rice Country Bread step by step
-
Boil the black rice. Boil the water in a pot; add in the black rice, and boil until cooked through while stirring. Itll take around 20~30 minutes. Try pushing down on a grain of rice with your finger to check if thoroughly cooked through. You might need to cook it a little more if you can still feel a hard core inside the grain. Measure out the boiling broth, and let cool sufficiently..
-
Add the * ingredients to the completely cooled broth and knead (See memos). Check that there is a slightly glutinous film on the surface of the dough, add in the lard, and knead some more. Add in the black rice as well, knead, and then proof for the first time. Let it rise until it doubles in size. It took an hour for me this time around. # Use the fermenting function on your oven, if available..
-
After the first proofing has finished, place the seam of the dough facing upwards, place on a sheet of canvas and flatten it out with the palm of your hand to release the gas thoroughly. Fold it like shown in the photo and roll it back up into ball. (Continued in the next photo→)..
-
Release the gases and excess air thoroughly each time you fold it..
-
Pinch the seams together tightly in order to roll it up. Place the seam facing downwards and cover with a sheet of canvas, followed by a damp cloth etc., and bench it. Let rest for 20 minutes..
-
After resting, lightly press down on the dough and shape it. While the seam side is facing down, press down on 3 sides with a rolling pin (making it into a rough triangle)..
-
Lightly brush the three sides with water..
-
Fold up the parts rolled with a rolling pin. Lightly press down on it to fix the shape..
-
Flip it over and proof for the last time. Itll take about 30 minutes~. It took 30 minutes for me on this day..
-
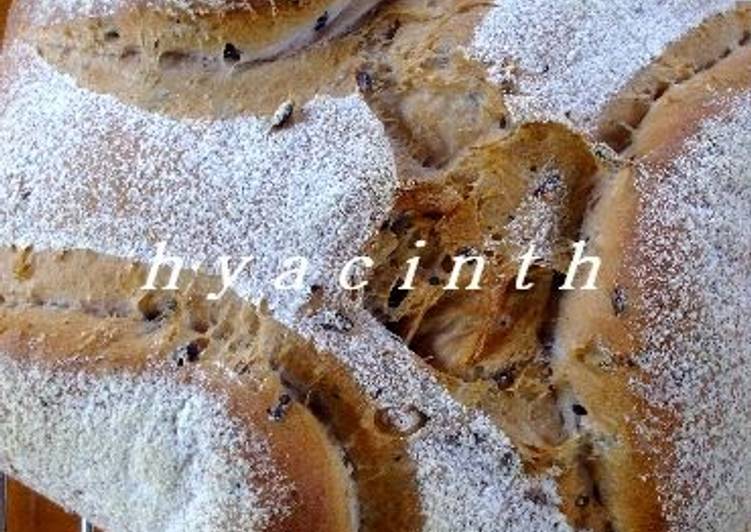
After the final proofing is finished, flip it over again. (The front is shown in the picture) Lightly brush the surface with water. Lightly sprinkle with bread flour through a tea strainer etc. Place into an oven preheated to 200℃ and bake for 30 minutes. (Please adjust time according to your oven)..
-
This is what it looks like when cut..
-
Use it as a sliced dinner bread for soups or stews etc..
In this course you will learn how to make amazing, delicious black rice bread.
The course includes simple, clear recipe and a video to teach you how to shape the dough.
If you have never baked bread, start with our FREE basic bread course.
The next day, drain the rice.
Remove from steamer and keep aside to cool down.